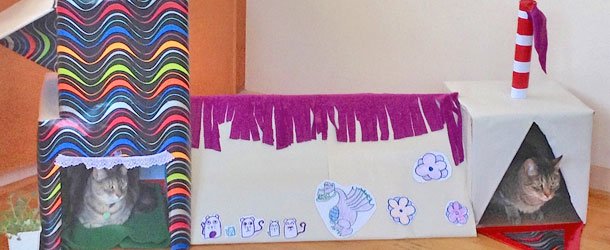
Kids can develop their design skills and let imaginations go wild when creating a playground or palace for their pet. Help your child repurpose cardboard boxes to give pets a place of their own to nap or play.
What you’ll need:
- sturdy cardboard boxes of various sizes
- cardboard tubes of various sizes
- packing tape and/or duct tape
- utility knife (for adult use)
- scissors
- ruler
- paper and pen
- carpet squares, pet blankets, or bedding
- wrapping paper, paint, or markers (optional)
Directions:
Collect at least three sturdy cardboard boxes. The size of the boxes you use depends on the size of your pet! Cats, small dogs, rabbits, ferrets, hamsters, and guinea pigs would all enjoy having their own place to play. Look for boxes that your pet can get in and out of easily.
Get your child thinking about how he or she could put the boxes together to make a safe, fun, and interesting environment for your pet. What are some different ways for your pet to get in, on top of, around, and through the boxes? Consider and discuss:
- Cutting openings in two cardboard boxes and joining them with a tunnel
- Stacking boxes and cutting openings at each level so your pet can reach the top
- Reinforcing boxes on lower levels for extra strength at the top
- Cutting windows and doors on each level so pets can run through and peek out
- Using cardboard tubes as tunnels for smaller pets or to make a place to hide treats or small toys
Now let your child put his or her ideas down on paper. What type of structure does he or she want to make, and how does he or she want it to look? Does he or she have a theme in mind? Is it a castle, a hotel, circus big top, fun house, or maze? How will he or she decorate it? Encourage him or her to use his or her imagination as he or she sketches his or her design.
Once your child has a design concept, provide a ruler, paper, pen, and scissors to create templates for making doors and windows. Doors and windows can be any shape, and it is helpful to have a paper template to trace onto the cardboard before cutting, especially for round openings.
Before outlining openings and cutting, make sure your child’s plan doesn’t cut away too much of the box’s structure. Have your child use the templates to trace the openings onto the boxes, helping your child measure and position the template appropriately so that the openings line up where two or more boxes meet.
Use the utility knife (for adult use) to cut out the openings for your child. Then have him or her lay out the boxes to make sure everything fits together as planned.
If your child would like to decorate his or her structure using wrapping paper, it is easier to wrap the boxes and cut the paper away from the openings before securing them together with tape. If he or she plans to use paint or markers to decorate, help him or her secure the boxes together with strong tape.
Once the outside decorations are complete, have your child add pet comforts such as toys or treats hidden in the corners of boxes or soft bedding to welcome your pet!
